Modern web development has reached an inflection point where conventional content management system architecture often struggles to meet strict performance demands, complex omni-channel publishing requirements, and modern user interface standards. For over two decades, traditional WordPress has operated as a monolithic application—stitching together the MySQL database, PHP business logic, administrative dashboard, and HTML presentation layer into a single, coupled environment. While this monolithic model made WordPress the most dominant content management system on the internet, it also introduced distinct performance ceilings, security vulnerabilities, and developer workflow constraints.
When enterprise websites grow in complexity, developers frequently encounter severe bottlenecks: render-blocking JavaScript, bloated theme templates, high server response times (TTFB), and fragile plugin dependencies. Enterprise teams often find themselves trapped in an operational battle, trying to optimize PHP execution times and database queries while modern JavaScript frameworks like React, Next.js, and Vue offer far superior client-side routing, static site generation (SSG), and incremental page updates.
This architectural dilemma is precisely why headless WordPress (also referred to as decoupled WordPress) has emerged as an industry-standard modern approach. By separating the back-end content management system from the front-end display layer, developers can retain WordPress’s powerful administrative editorial interface while building lightning-fast, highly secure, and flexible front-end applications powered by modern JavaScript frameworks. In this comprehensive guide, we will step through the complete process of planning, configuring, building, optimizing, and deploying a modern headless WordPress website from scratch.
Understanding the Architecture: Monolithic vs. Headless WordPress
To successfully build and maintain a decoupled web application, you must first understand how data flows through a headless system compared to a traditional WordPress installation. The structural shift changes how content is created, queried, rendered, and delivered to end users.
The Traditional (Monolithic) WordPress Model
In a standard WordPress architecture, every browser request triggers a series of server-side events. The web server (Apache or NGINX) passes the request to PHP, which loads the WordPress core, active plugins, and theme functions. PHP queries the MySQL database to fetch content, processes shortcodes and hooks, compiles the HTML output using the active theme’s template files (such as header.php, single.php, and footer.php), and sends the fully rendered HTML document back to the browser. This coupled pipeline visualizes as follows:
Browser Request → NGINX/Apache → PHP Engine → MySQL Database → PHP Template Parsing → Monolithic HTML Output
This approach is simple and effective for standard websites, but it couples the front-end user experience directly to back-end server resource limits, database query speeds, and PHP execution overhead.
The Headless (Decoupled) WordPress Model
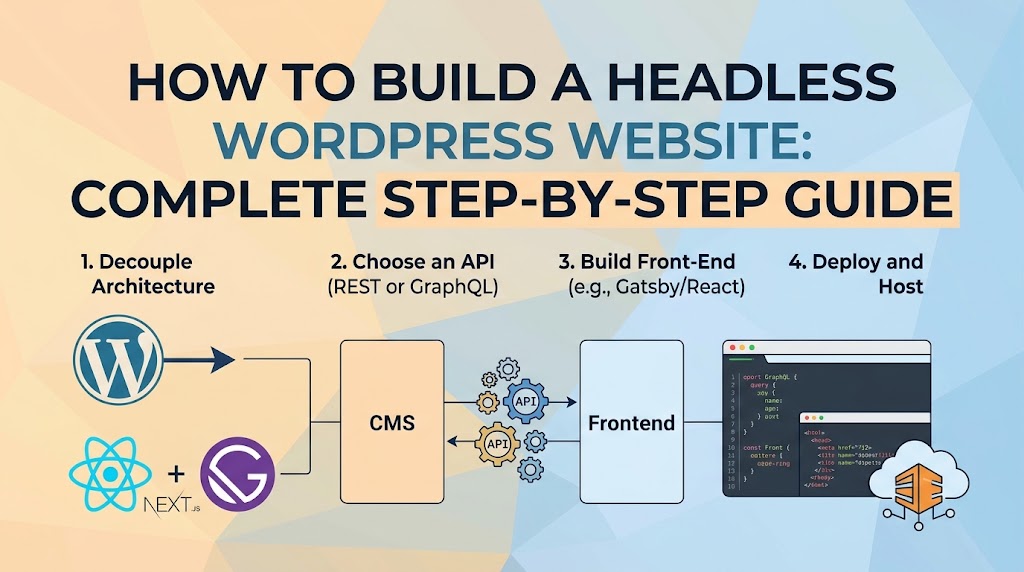
In a headless architecture, WordPress acts strictly as a Content Management System (CMS) backend. The front-end theme system is completely disabled or bypassed. Editors continue using the familiar WordPress Gutenberg admin dashboard to write posts, upload media, and manage categories. However, instead of generating HTML, WordPress exposes its data as a structured structured application programming interface (API)—either via the native REST API or through WPGraphQL.
A completely independent front-end application (built using frameworks like Next.js, Nuxt.js, SvelteKit, or React) fetches content from the WordPress API during build time or at request runtime. The front-end renders the user interface and serves pre-rendered HTML or client-rendered components to the visitor via global Content Delivery Networks (CDNs). The decoupled request pipeline operates like this:
Content Creation (WP Admin) → Data API (REST / WPGraphQL) → Front-End App (Next.js/React) → Edge CDN → Client Browser
REST API vs. WPGraphQL: Choosing Your Data Layer
When decoupling WordPress, you must select the protocol for querying content from the backend. The two primary choices are the native REST API and WPGraphQL.
- WordPress REST API: Included in WordPress core by default. It uses standard HTTP methods (GET, POST, PUT, DELETE) and endpoints like
/wp-json/wp/v2/posts. While easy to inspect, it often suffers from “over-fetching” (returning massive JSON payloads containing fields you do not need) or “under-fetching” (requiring multiple HTTP calls to retrieve relational data like post authors, featured images, and taxonomies). - WPGraphQL: A free, open-source plugin that adds a GraphQL server to your WordPress site. WPGraphQL allows the front-end application to request exactly the fields it needs in a single HTTP POST request. It provides strongly typed schemas, native support for nested relationships, and superior developer ergonomics when working with React and Next.js.
For this guide, we will use WPGraphQL due to its performance benefits, precise data fetching capability, and native integration with modern JavaScript ecosystems.
Pros and Cons of Headless WordPress
Before migrating production workloads to a headless architecture, technical leaders must weigh the performance and developer experience advantages against the added operational complexity.
Advantages
- Exceptional Performance and Lighthouse Scores: Front-end applications hosted on platforms like Vercel or Netlify leverage Static Site Generation (SSG) and Incremental Static Regeneration (ISR). Web pages are pre-built into static HTML files and served instantly from global CDN edges, yielding near-perfect Core Web Vitals scores.
- Enhanced Security Surface: The WordPress admin dashboard and database can be hidden behind a private network, internal domain, or strict IP whitelist. Because public users only interact with static front-end builds or node runtime edges, traditional WordPress vector attacks (such as XML-RPC exploits, direct SQL injections, and brute-force
wp-login.phpattacks) are virtually eliminated. - Developer Flexibility and Modern Stack: Front-end developers are liberated from PHP templating constraints, legacy enqueue systems, and jQuery dependencies. They can build rich user interfaces using modern CSS frameworks (Tailwind CSS), TypeScript, modular component libraries, and client-side state management.
- Omnichannel Content Distribution: A single headless WordPress backend can simultaneously publish content to a Next.js web application, a native iOS/Android mobile application, digital signage, smart watches, and third-party IoT integrations using standardized GraphQL queries.
Disadvantages and Trade-Offs
- Loss of Visual Theme and Page Builders: Visual visual site builders such as Elementor, Divi, and Beaver Builder will not function out of the box on a decoupled front-end application. Page layouts must be structured programmatically or mapped using Gutenberg block parsers.
- Plugin Ecosystem Incompatibilities: WordPress plugins that rely on front-end action hooks (such as
wp_headorwp_footer)—including many form plugins, popups, breadcrumb managers, and social sharing tools—do not automatically render on your decoupled site without custom API bridges. - Increased Infrastructure Complexity: Instead of managing a single shared hosting account, your team must orchestrate two distinct environments: the WordPress backend origin server and the front-end application hosting platform, along with webhook build triggers and environment variables.
- Draft Previews and SEO Overhead: Features taken for granted in monolithic WordPress—such as live draft previews, real-time page revisions, dynamic XML sitemaps, and canonical meta tag injection—require deliberate manual configuration in a decoupled setup.
Prerequisites and Environment Setup
To follow along with this step-by-step tutorial, ensure you have the following software and access credentials ready in your local development workspace:
- Local WordPress Environment: A local WordPress installation running on LocalWP, Docker, DevKinsta, or DDEV (WordPress version 6.0+ recommended).
- Node.js Environment: Node.js v18.0.0 or higher installed on your local machine, along with
npm,yarn, orpnpm. - Code Editor: Visual Studio Code or your preferred IDE.
- Basic Knowledge: Familiarity with JavaScript (ES6+), React fundamentals, and basic terminal commands.
Step 1: Configuring WordPress as a Headless Backend
We will begin by configuring our WordPress environment to function strictly as a headless backend API server. This involves installing required backend plugins, enabling GraphQL support, setting permalinks, and configuring Cross-Origin Resource Sharing (CORS).
1.1 Install WPGraphQL and Extra Extensions
Log into your local WordPress administrative dashboard (e.g., http://my-headless-wp.local/wp-admin) and navigate to Plugins > Add New.
- Search for WPGraphQL by Jason Bahl. Click Install Now and then Activate.
- (Optional but Recommended) If you use Advanced Custom Fields, search for and install WPGraphQL for Advanced Custom Fields. This automatically exposes your custom ACF fields directly to your GraphQL schema.
Once activated, you will see a new top-level menu item named GraphQL and an interactive IDE tab named GraphiQL IDE in your WordPress admin top toolbar.
1.2 Configure Permalinks
WPGraphQL requires pretty permalinks to resolve queries correctly. Navigate to Settings > Permalinks in your WordPress admin dashboard. Select Post name (or any structure other than “Plain”) and click Save Changes. This flushes rewrite rules and ensures custom endpoints route seamlessly.
1.3 Configure CORS (Cross-Origin Resource Sharing)
When your front-end application (running locally on http://localhost:3000 or in production on https://my-site.vercel.app) requests data from your WordPress backend (running on http://my-headless-wp.local), browser security rules will block the request unless proper CORS headers are present.
To safely handle CORS headers on your backend, add the following code snippet to your active child theme’s functions.php file or load it via a custom site-specific plugin:
<?php
/**
 * Enable HTTP Cross-Origin Resource Sharing (CORS) for Headless GraphQL/REST Requests.
 */
add_action( 'send_headers', function() {
    // Replace the wildcard '*' with your actual frontend domain in production environments
    $allowed_origins = array(
        'http://localhost:3000',
        'https://your-production-frontend.com'
    );

    $origin = isset( $_SERVER['HTTP_ORIGIN'] ) ? $_SERVER['HTTP_ORIGIN'] : '';

    if ( in_array( $origin, $allowed_origins, true ) ) {
        header( "Access-Control-Allow-Origin: " . esc_url_raw( $origin ) );
        header( "Access-Control-Allow-Credentials: true" );
        header( "Access-Control-Allow-Headers: Authorization, Content-Type, X-Requested-With" );
        header( "Access-Control-Allow-Methods: GET, POST, OPTIONS" );
    }

    // Handle preflight OPTIONS requests immediately
    if ( isset( $_SERVER['REQUEST_METHOD'] ) && $_SERVER['REQUEST_METHOD'] === 'OPTIONS' ) {
        status_header( 200 );
        exit();
    }
} );
1.4 Registering Custom Post Types for GraphQL
If you create Custom Post Types (CPTs) programmatically or via plugins like CPT UI, you must explicitly instruct WordPress to expose them to the GraphQL schema. When registering a custom post type via PHP, ensure you pass the show_in_graphql, graphql_single_name, and graphql_plural_name arguments in your array:
<?php
/**
 * Register a custom post type exposed to WPGraphQL schema.
 */
function register_portfolio_cpt() {
    $args = array(
        'label'               => __( 'Portfolios', 'textdomain' ),
        'public'              => true,
        'show_in_rest'        => true,
        'show_in_graphql'     => true, // Enables GraphQL schema exposure
        'graphql_single_name' => 'portfolio',
        'graphql_plural_name' => 'portfolios',
        'supports'            => array( 'title', 'editor', 'thumbnail', 'excerpt' ),
        'has_archive'         => true,
        'rewrite'             => array( 'slug' => 'portfolio' ),
    );
    register_post_type( 'portfolio', $args );
}
add_action( 'init', 'register_portfolio_cpt' );
1.5 Test Your GraphQL Endpoint with GraphiQL
Open the **GraphiQL IDE** in your WordPress admin menu. Paste the following test query into the left panel and click the Play icon:
query GetPostsTest {
  posts {
    nodes {
      id
      title
      slug
      date
      excerpt
      featuredImage {
        node {
          sourceUrl
          altText
        }
      }
    }
  }
}
If your WordPress backend is configured properly, you will receive a clean JSON response on the right pane containing your posts array. Your backend API is now ready.
Step 2: Building the Front-End Application with Next.js
With our WordPress backend serving GraphQL data, we will build a modern front-end application using **Next.js 14** (App Router). Next.js offers dynamic hybrid rendering options—Static Site Generation (SSG), Server-Side Rendering (SSR), and Incremental Static Regeneration (ISR)—making it ideal for headless WordPress implementations.
2.1 Initialize Next.js Project
Open your terminal, navigate to your root projects directory (outside your WordPress folder), and run the following command to bootstrap a new Next.js application:
npx create-next-app@latest headless-wp-frontend
When prompted by the command-line interface, select the following options:
- Would you like to use TypeScript? Yes (or No, depending on project specs; this guide uses JavaScript/ES6 for broad accessibility)
- Would you like to use ESLint? Yes
- Would you like to use Tailwind CSS? Yes
- Would you like to use `src/` directory? No
- Would you like to use App Router? Yes (Recommended)
- Would you like to customize the default import alias (`@/*`)? No
Navigate into your project directory and install the required dependencies for querying GraphQL and parsing HTML content safely:
cd headless-wp-frontend
npm install @apollo/client graphql html-react-parser
2.2 Configure Environment Variables
Create a file named .env.local in the root directory of your Next.js project. Add your WordPress GraphQL endpoint URL:
NEXT_PUBLIC_WORDPRESS_API_URL=http://my-headless-wp.local/graphql
WORDPRESS_PREVIEW_SECRET=your_super_secret_preview_token
Note: Replace http://my-headless-wp.local/graphql with your actual local or hosted WordPress URL endpoint.
2.3 Create GraphQL Client and API Service Utilities
Create a directory named lib in your project root, and place a file named wordpress.js inside it. This utility handles all fetch requests sent to our WordPress backend.
// lib/wordpress.js

const API_URL = process.env.NEXT_PUBLIC_WORDPRESS_API_URL;

/**
 * Core utility function to execute GraphQL queries against WordPress.
 */
export async function fetchAPI(query = '', { variables } = {}) {
  const headers = { 'Content-Type': 'application/json' };

  if (process.env.WORDPRESS_AUTH_REFRESH_TOKEN) {
    headers['Authorization'] = `Bearer ${process.env.WORDPRESS_AUTH_REFRESH_TOKEN}`;
  }

  // Execute native HTTP POST request to GraphQL endpoint
  const res = await fetch(API_URL, {
    headers,
    method: 'POST',
    body: JSON.stringify({
      query,
      variables,
    }),
    next: {
      revalidate: 60, // Cache data and revalidate every 60 seconds (ISR)
    },
  });

  const json = await res.json();
  if (json.errors) {
    console.error(json.errors);
    throw new Error('Failed to fetch API data from WordPress backend');
  }

  return json.data;
}

/**
 * Fetch list of all blog posts for index pages.
 */
export async function getAllPostsForHome() {
  const data = await fetchAPI(
    `
    query AllPosts {
      posts(first: 20, where: { orderby: { field: DATE, order: DESC } }) {
        nodes {
          id
          title
          excerpt
          slug
          date
          featuredImage {
            node {
              sourceUrl
              altText
            }
          }
          author {
            node {
              name
              avatar {
                url
              }
            }
          }
        }
      }
    }
  `
  );
  return data?.posts?.nodes || [];
}

/**
 * Fetch complete data for a single post by slug.
 */
export async function getPostBySlug(slug) {
  const data = await fetchAPI(
    `
    query PostBySlug($id: ID!, $idType: PostIdType!) {
      post(id: $id, idType: $idType) {
        id
        title
        content
        slug
        date
        modified
        excerpt
        featuredImage {
          node {
            sourceUrl
            altText
          }
        }
        author {
          node {
            name
            avatar {
              url
            }
          }
        }
        categories {
          nodes {
            name
            slug
          }
        }
      }
    }
  `,
    {
      variables: {
        id: slug,
        idType: 'SLUG',
      },
    }
  );

  return data?.post;
}

/**
 * Fetch all post slugs for dynamic route static generation.
 */
export async function getAllPostSlugs() {
  const data = await fetchAPI(`
    query AllPostSlugs {
      posts(first: 100) {
        nodes {
          slug
        }
      }
    }
  `);
  return data?.posts?.nodes || [];
}
2.4 Build the Blog Archive (Homepage)
Now update the main page file app/page.js to query the list of posts from WordPress and render them cleanly using modern Tailwind CSS card UI components.
// app/page.js

import Link from 'next/link';
import Image from 'next/image';
import parse from 'html-react-parser';
import { getAllPostsForHome } from '@/lib/wordpress';

export const revalidate = 60; // Revalidate page data every 60 seconds

export default async function HomePage() {
  const posts = await getAllPostsForHome();

  return (
    <main className="max-w-6xl mx-auto px-4 py-12">
      <header className="mb-12 text-center">
        <h1 className="text-4xl font-extrabold tracking-tight text-gray-900 sm:text-5xl">
          Headless WordPress Developer Hub
        </h1>
        <p className="mt-4 text-xl text-gray-600">
          Powered by WordPress Backend + Next.js App Router Front-End
        </p>
      </header>

      <div className="grid grid-cols-1 md:grid-cols-2 lg:grid-cols-3 gap-8">
        {posts.map((post) => {
          const featuredImg = post.featuredImage?.node?.sourceUrl;
          const altText = post.featuredImage?.node?.altText || post.title;

          return (
            <article
              key={post.id}
              className="bg-white rounded-xl shadow-md overflow-hidden border border-gray-100 hover:shadow-lg transition-shadow duration-300 flex flex-col"
            >
              {featuredImg && (
                <div className="relative h-48 w-full bg-gray-200">
                  <img
                    src={featuredImg}
                    alt={altText}
                    className="w-full h-full object-cover"
                  />
                </div>
              )}

              <div className="p-6 flex-1 flex flex-col justify-between">
                <div>
                  <h2 className="text-xl font-bold text-gray-900 line-clamp-2 hover:text-blue-600 transition-colors">
                    <Link href={`/blog/${post.slug}`}>{post.title}</Link>
                  </h2>
                  <div className="mt-3 text-gray-600 text-sm line-clamp-3 prose prose-slate">
                    {parse(post.excerpt || '')}
                  </div>
                </div>

                <div className="mt-6 flex items-center justify-between border-t pt-4 text-xs text-gray-500">
                  <span>By {post.author?.node?.name || 'Admin'}</span>
                  <time dateTime={post.date}>
                    {new Date(post.date).toLocaleDateString('en-US', {
                      month: 'short',
                      day: 'numeric',
                      year: 'numeric',
                    })}
                  </time>
                </div>
              </div>
            </article>
          );
        })}
      </div>
    </main>
  );
}
2.5 Create Dynamic Post Detail Route `/blog/[slug]`
Create a dynamic folder path: app/blog/[slug]/page.js. This dynamic component pre-generates single post pages statically using generateStaticParams() while safely parsing HTML returned by the WordPress Gutenberg block editor.
// app/blog/[slug]/page.js

import { getPostBySlug, getAllPostSlugs } from '@/lib/wordpress';
import parse from 'html-react-parser';
import { notFound } from 'next/navigation';

// Statically generate parameters for all posts at build time
export async function generateStaticParams() {
  const posts = await getAllPostSlugs();
  return posts.map((post) => ({
    slug: post.slug,
  }));
}

// Dynamic SEO Metadata Generation
export async function generateMetadata({ params }) {
  const post = await getPostBySlug(params.slug);
  if (!post) return { title: 'Post Not Found' };

  return {
    title: `${post.title} | Headless WordPress`,
    description: post.excerpt ? post.excerpt.replace(/(<([^>]+)>)/gi, '') : '',
    openGraph: {
      title: post.title,
      images: post.featuredImage?.node?.sourceUrl ? [post.featuredImage.node.sourceUrl] : [],
    },
  };
}

export default async function SinglePostPage({ params }) {
  const post = await getPostBySlug(params.slug);

  if (!post) {
    notFound();
  }

  return (
    <article className="max-w-4xl mx-auto px-4 py-12">
      {/* Article Header */}
      <header className="mb-8">
        <div className="flex items-center space-x-2 text-sm text-blue-600 font-semibold mb-3">
          {post.categories?.nodes?.map((cat) => (
            <span key={cat.slug} className="bg-blue-50 px-2.5 py-1 rounded-full">
              {cat.name}
            </span>
          ))}
        </div>

        <h1 className="text-3xl sm:text-5xl font-extrabold text-gray-900 tracking-tight leading-tight">
          {post.title}
        </h1>

        <div className="mt-6 flex items-center space-x-4 border-b border-gray-200 pb-6 text-sm text-gray-600">
          {post.author?.node?.avatar?.url && (
            <img
              src={post.author.node.avatar.url}
              alt={post.author.node.name}
              className="w-10 h-10 rounded-full"
            />
          )}
          <div>
            <p className="font-medium text-gray-900">{post.author?.node?.name}</p>
            <p>
              Published on{' '}
              {new Date(post.date).toLocaleDateString('en-US', {
                month: 'long',
                day: 'numeric',
                year: 'numeric',
              })}
            </p>
          </div>
        </div>
      </header>

      {/* Featured Image */}
      {post.featuredImage?.node?.sourceUrl && (
        <div className="mb-10 rounded-2xl overflow-hidden shadow-lg">
          <img
            src={post.featuredImage.node.sourceUrl}
            alt={post.featuredImage.node.altText || post.title}
            className="w-full h-auto object-cover max-h-[500px]"
          />
        </div>
      )}

      {/* HTML Article Body */}
      <div className="prose prose-lg prose-blue max-w-none leading-relaxed text-gray-800">
        {parse(post.content || '')}
      </div>
    </article>
  );
}
Step 3: Implementing Core WordPress Features in Headless Mode
Decoupling your site requires rebuilding traditional core capabilities that rely on single-monolith setups: preview mode, dynamic navigation menus, form handling, and search engine optimization (SEO).
3.1 Live Draft Preview Mode
Content editors need to preview unpublished draft content in real-time before pushing updates live. Next.js supports dynamic draft previews using draftMode() route handlers.
Create an API route handler in your Next.js project at app/api/preview/route.js:
// app/api/preview/route.js

import { draftMode } from 'next/headers';
import { redirect } from 'next/navigation';
import { getPostBySlug } from '@/lib/wordpress';

export async function GET(request) {
  const { searchParams } = new URL(request.url);
  const secret = searchParams.get('secret');
  const slug = searchParams.get('slug');

  // Verify secret token matching env file
  if (secret !== process.env.WORDPRESS_PREVIEW_SECRET || !slug) {
    return new Response('Invalid token or missing slug', { status: 401 });
  }

  // Verify post existence in WordPress
  const post = await getPostBySlug(slug);
  if (!post) {
    return new Response('Invalid slug', { status: 404 });
  }

  // Enable Draft Mode in Next.js cookie
  draftMode().enable();

  // Redirect client browser to post route
  redirect(`/blog/${post.slug}`);
}
In your WordPress backend, you can hook into the post preview link via functions.php to automatically point draft previews directly to your Next.js API preview endpoint:
<?php
/**
 * Customize WordPress Preview Link for Decoupling.
 */
add_filter( 'preview_post_link', function( $link, $post ) {
    $frontend_url = 'http://localhost:3000'; // Or your deployment domain
    $secret       = 'your_super_secret_preview_token';

    return sprintf(
        '%s/api/preview?secret=%s&slug=%s',
        $frontend_url,
        $secret,
        $post->post_name
    );
}, 10, 2 );
3.2 Dynamic WordPress Menus Integration
Rather than hardcoding header menu navigation in React, fetch menus created dynamically under Appearance > Menus in WordPress via WPGraphQL:
query GetHeaderMenu {
  menu(id: "Header Menu", idType: NAME) {
    menuItems {
      nodes {
        id
        label
        path
      }
    }
  }
}
Parse path values into client Next.js <Link href={item.path}> components for instant client-side transitions.
3.3 Handling Contact Forms Headlessly
Popular form plugins like Contact Form 7 or Gravity Forms provide REST/GraphQL API extensions (e.g., WPGraphQL for Gravity Forms or Contact Form 7 API). Alternatively, you can capture client form submissions in React state and send them directly to serverless API routes or platforms like Formspree, Hubspot, or direct WordPress REST API endpoints.
What Causes Headless WordPress Issues (Root Causes & Pitfalls)
Transitioning from a traditional monolithic setup to a decoupled architecture introduces specific runtime edge cases and build failures. Understanding these common root causes allows development teams to diagnose and fix bugs efficiently.
1. CORS Blocking and Failed Preflight OPTIONS Requests
Symptom: The browser console throws Access to fetch at 'http://backend.local/graphql' from origin 'http://localhost:3000' has been blocked by CORS policy.
Root Cause: Browser security enforces strict origin policies. When client-side JavaScript executes a POST request with standard JSON headers across origins, the browser sends an HTTP OPTIONS preflight request to verify allowed hosts. If your web server (NGINX/Apache) or WordPress backend does not return `Access-Control-Allow-Origin` headers and a 200 OK HTTP response status code to preflight requests, fetch calls fail outright.
2. Stale Front-End Content and Invalidation Failures
Symptom: An editor publishes a critical post update in WordPress, but the live site continues displaying old text indefinitely.
Root Cause: Front-end frameworks rely heavily on static site generation (SSG) and CDN caching layers. If Incremental Static Regeneration (ISR) revalidation intervals are set too long, or if publish webhooks fail to hit your front-end cache-busting endpoint, static edge nodes will continue serving stale, cached HTML snapshots.
3. Broken SEO Metadata and Missing Canonical Tags
Symptom: Search engines index the front-end incorrectly, index the backend administrative domain by mistake, or flag pages for duplicate content.
Root Cause: Traditional SEO plugins (such as Yoast SEO or Rank Math) inject meta tags into the WordPress theme’s wp_head() output. In a headless setup, these hooks never run. If developers fail to fetch SEO plugin data via APIs (using extensions like wp-graphql-yoast-seo) and render `<title>`, open graph tags, and canonical tags manually inside Next.js generateMetadata(), search visibility drops sharply.
4. Image Path Resolution and Unoptimized Asset Loading
Symptom: Images in post body content break, load slowly, or fail to render inside modern Next.js <Image /> components.
Root Cause: Content saved inside the Gutenberg editor contains absolute media URL links pointing to the backend origin host (e.g., http://my-backend.local/wp-content/uploads/2024/05/photo.jpg). Next.js requires strict configuration in next.config.js under `images.remotePatterns` to authorize external domains for optimization; unparsed standard `<img>` tags in HTML strings bypass modern WebP generation entirely.
Deploying and Hosting Headless WordPress
Because the frontend and backend are decoupled, you must deploy each layer to environments optimized specifically for their architectural needs.
1. Backend WordPress Hosting
Host your WordPress backend on servers optimized for MySQL and PHP performance (such as WP Engine, Kinsta, Cloudways, or dedicated AWS EC2/DigitalOcean droplets). Ensure your site uses SSL/TLS (HTTPS) in production environments.
Security Tip: Secure your WordPress backend by blocking public access to front-end paths while keeping /wp-admin and /graphql accessible. Alternatively, restrict wp-admin access using HTTP Basic Authentication or IP whitelisting.
2. Front-End Hosting (Vercel, Netlify, or Cloudflare Pages)
Deploy your Next.js project to global edge platforms like Vercel or Netlify for best performance:
- Push your Next.js repository codebase to GitHub, GitLab, or Bitbucket.
- Connect your repository to Vercel or Netlify.
- Add project environment variables: Set
NEXT_PUBLIC_WORDPRESS_API_URLto your live production GraphQL endpoint URL (e.g.,https://api.yourdomain.com/graphql). - Click Deploy. The platform will build static pages, deploy serverless route functions, and distribute content globally across edge CDNs.
3. Setting Up Automated Revalidation Webhooks
To ensure your Next.js static site updates instantly whenever an editor publishes or updates a post in WordPress, set up an On-Demand Revalidation API route in Next.js:
// app/api/revalidate/route.js

import { revalidatePath } from 'next/cache';

export async function POST(request) {
  const secret = request.headers.get('x-revalidate-secret');

  if (secret !== process.env.WORDPRESS_PREVIEW_SECRET) {
    return new Response(JSON.stringify({ message: 'Invalid Secret' }), { status: 401 });
  }

  const body = await request.json();
  const slug = body?.post?.post_name;

  if (slug) {
    // Purge cache for home page and modified single post route
    revalidatePath('/');
    revalidatePath(`/blog/${slug}`);
    return new Response(JSON.stringify({ revalidated: true, now: Date.now() }), { status: 200 });
  }

  return new Response(JSON.stringify({ message: 'Missing post slug' }), { status: 400 });
}
In WordPress, install a webhook triggering plugin (like JAMstack Deployments or WP Webhooks) and configure it to fire a POST request containing your secret header to https://your-frontend.com/api/revalidate whenever post updates occur.
Prevention Tips and Best Practices
To avoid security traps, performance degradation, and operational issues in production, follow these key practices:
- Enforce Strict CORS Configuration: Never leave
Access-Control-Allow-Origin: *open in production environments. Restrict authorized origin requests exclusively to your known front-end deployment domains. - Implement Database Query Caching: Use WPGraphQL Smart Cache or object caching (Redis / Memcached) on the WordPress backend server to prevent heavy GraphQL query execution from maxing out database connection pools under traffic spikes.
- Configure Robots.txt on Backend: Prevent search engines from indexing your backend administration domain directly. Place a
robots.txtfile on the backend that disallows indexing across all paths except API endpoints, while keeping full SEO meta tags enabled on the front-end site. - Configure Next.js Remote Image Domains: Secure image handling by defining authorized backend asset hostnames inside your
next.config.jsconfiguration file:module.exports = { images: { remotePatterns: [ { protocol: 'https', hostname: 'api.yourdomain.com', pathname: '/wp-content/uploads/**', }, ], }, } - Graceful Fallbacks for Dynamic Content: Always build client component fallbacks, loading skeletons, and custom React Error Boundaries to prevent full front-end app crashes if backend API requests fail or time out.
Conclusion
Decoupling WordPress into a headless architecture offers a powerful combination for web projects: it pairs WordPress’s intuitive, client-friendly content management capabilities with the speed, security, and rendering power of modern front-end frameworks like Next.js and React.
While headless WordPress introduces added operational overhead around CORS setup, draft preview routes, manual SEO meta handling, and decoupled hosting pipelines, the performance gains are significant. Sites built using this architecture achieve lightning-fast page loads, near-perfect Core Web Vitals, improved security, and modern front-end workflows capable of serving content seamlessly across any device or client endpoint.